
Objetive:
The focus of this article is to provide a detailed and understandable presentation of the process of uploading, generating, and importing documents, accompanied by a description of the corresponding signature workflow, with the purpose of supporting the client in document management within the platform. The objective of this process is to simplify and standardize the way documents are managed, giving users the ability to select and assign multiple signers quickly and flexibly, in line with greater operational efficiency.
Scope:
The article introduces the possibility of configuring a maximum of 3 signers per document in the signature workflow. This composition consists of the employee and two additional signers (on behalf of the company), who can be chosen from a variety of options, including the employee's supervisor, the legal representative, or another user. This expansion seeks to overcome previous restrictions in the signature workflow and, at the same time, implement a consistent process for uploading, generating, and importing documents.
Additionally, regarding the explanations about uploading and generating files, our purpose is to provide a guide for each of these procedures, allowing administrators to easily understand how to correctly enter and manage each element on the platform.
Glossary:
Platform:
-
Variable:A marker used to represent a value that can change or be provided when the template is used in document generation.
-
Template:A generic file where the variables to be used for generating documents for each employee are added.
-
Signature order:Establishes the sequence of signers for a document.
-
Automatic signature workflow:Will automatically notify the actors in the signature process (reviewer, company signers, employee) when they need to sign the generated document.
-
Reviewer/approver:Employee who approves or rejects the documents generated for signature.
-
Employee:Employee for whom the employment document to be signed is being generated.
-
Company signer:Legal representative, supervisor, or others who sign employment documents generated for employees on behalf of the company.
-
Notifications:Action to indicate to the reviewer and/or signers that they need to take action on the document (approve/reject, sign)
API: (miportal.buk.cl/apidocs#/Documentos)
-
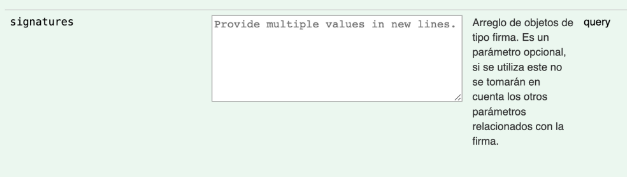
Signatures: These are the required signatures on a document. A maximum of 3 signers per document is allowed, considering that one of the signers may be the employee of the document, and there may be a maximum of two company signers,it should be noted that they must be different people. Each signature includes the following:
-
Signature_type: The type of signer, which can be one of the following types:
-
Employee_signature: Employee's signature.
-
Legal_agent_signature: Legal Representative's signature.
-
Second_legal_agent_signature: Second Legal Representative's signature. This type of signer is only accepted if a legal_agent_signature signer has previously been assigned.
-
Supervisor_signature: Signature of the employee's supervisor. When a signature of this type is sent, the person's id will be automatically calculated by the platform, assigning the supervisor of the employee to whom the document is uploaded as the signer.
-
Other_signature: Signature of a specific user.
-
Second_other_signature: Signature of a second specific user. This type of signer is only accepted if an other_signature signer has previously been assigned.
-
-
Position: Used to set the order of the signatures. If a specific order for the signers is desired, this parameter must have a value between 1 and 3. If no order is desired, you can leave it blank, send position as null, or simply not send it.
-
-
Person_id: The id of the person who will be designated as signer. If the signer type is supervisor or employee, then this field will not be considered, as the signer is calculated on the Buk server.
-
Reviewer_idThis parameter is used to assign a reviewer to the document, who can be any employee. This reviewer can approve or reject the document in a specific tab for this purpose in the document index on the platform. This action will not make any changes to the content of the document; however, it will affect the signature process. That is, if a document requires a reviewer, and it has not been reviewed or approved, then none of the people assigned to sign the document will be able to do so.
Create/edit templates:
In order to establish this process, you will need to adjust the document template. To do this, go to "Administrativo" in the "Documentos y Firmas" module. There, select "Plantillas," edit from the pencil (✏) or create a new template type so you can define the new signature workflow and set the option, if you wish, to define a reviewer who will be responsible for approving or rejecting the document before starting the signature workflow. The reviewer can be the employee's supervisor or any other employee enabled in the company's url. Set who the signers will be and save the information to make the changes.
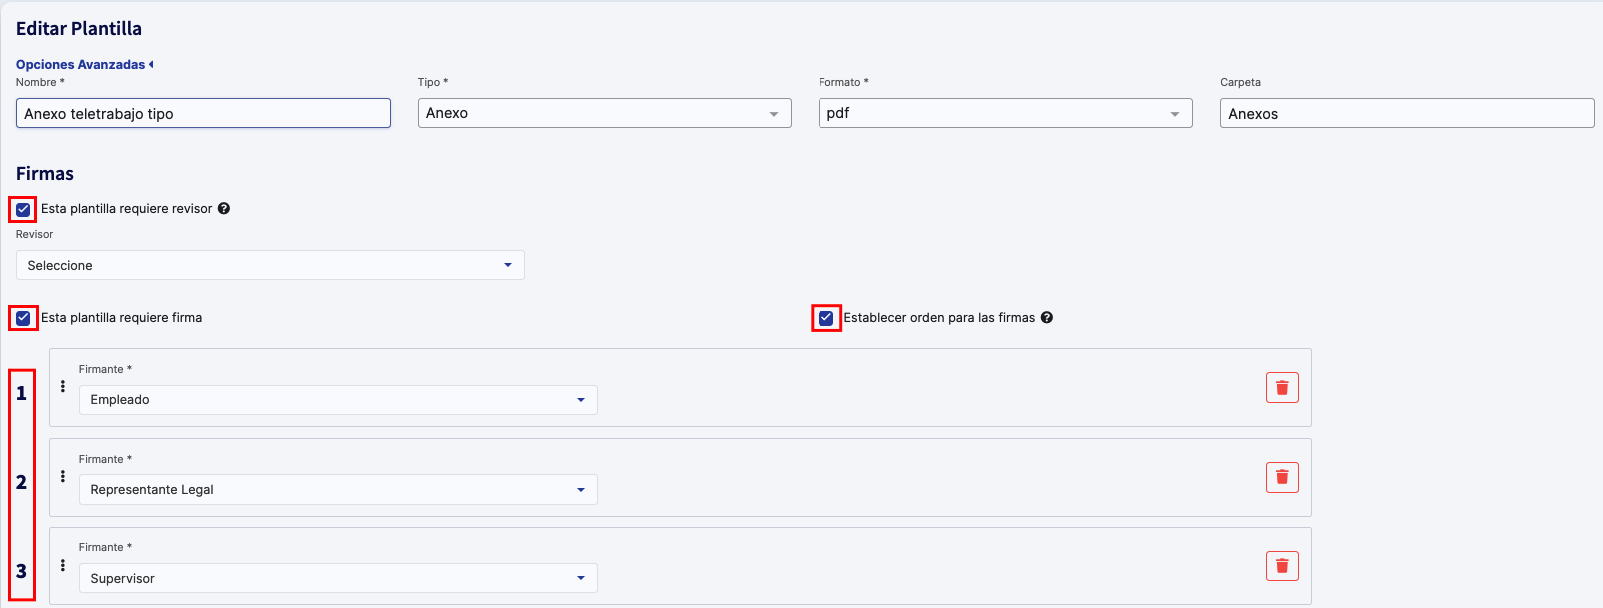
Additionally, you will have the ability to set an order for the document signers by activating the "Set order for signatures" checkbox, as well as upload, generate, and import documents following this same signature structure, allowing you to select multiple signers who are not necessarily the Legal Representative. This process will be uniform, whether you are generating or uploading a document from the employee's profile, importing it through importers, or even managing it from the API.
Note:In the variables section, two new variables have been included{{firma.primer_firmante.nombre}}and{{firma.segundo_firmante.nombre}}, which are used to display the names of the company signers selected in the template when configured with signature order.As shown in the image, with the configuration given in the template, the variable{{firma.primer_firmante.nombre}} will display the name of thelegal representativeselected during document generation, and likewise the second variable will display the name of thesupervisorof the employee for whom the document was generated.
Below we describe each process so you cangenerate, import, or upload documents, correctly setting the signers:
Individual Platform Process:
We can generate or upload a document individually and at the same time designate our signers:
- Generate document:From the employee's profile, in the "Documents" tab, click on "Generate Document," choose the template you want to use as a basis for generating the file, and select the reference period for the associated variables. According to the configuration defined in the signature workflow in the document template, you will be able to preview the involved signers. If you have set a legal representative or more in the template, define who will be the representatives signing the document and, once you are ready, click on "Generate Document."
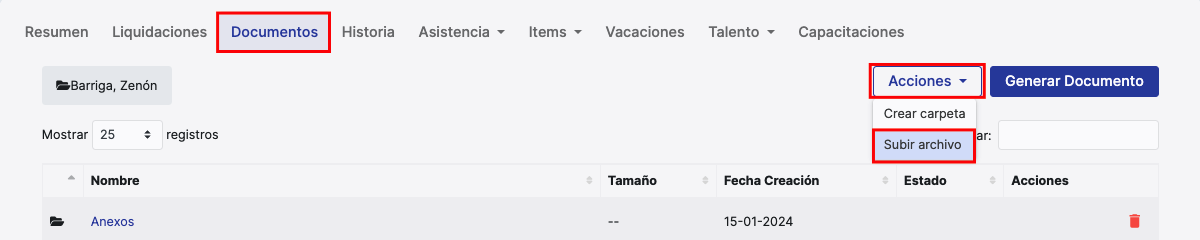
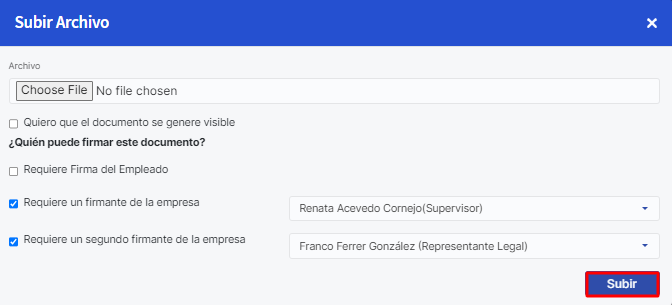
- Upload document:From the employee's profile, in the "Documents" tab, click on "Upload file." After selecting the document you want to upload, check the corresponding boxes to choose your signers. These may include the employee and two company signers, such as the supervisor, legal representative, or others. Once you have made your selections, click on "Upload."
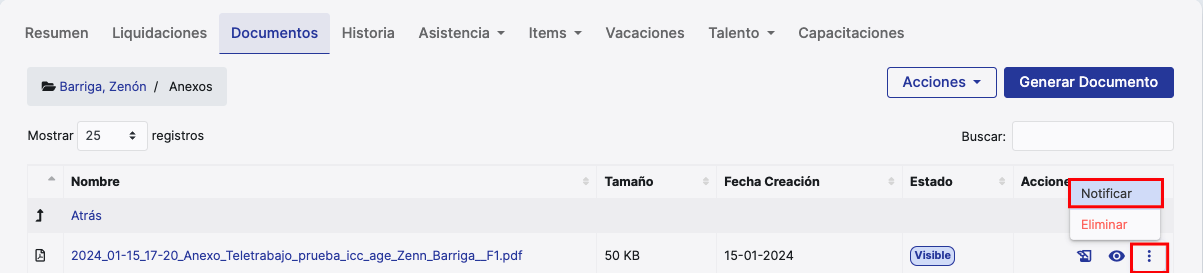
After generating or uploading the document, you will have the option to make the document visible and notify each recipient individually. To do this, go to the employee's profile and select the "Documents" tab. There you will find the document you want to notify. Click on the three dots and choose the "Notify" option.
Mass Platform Process:
We can generate or upload a document individually and at the same time designate our signers:
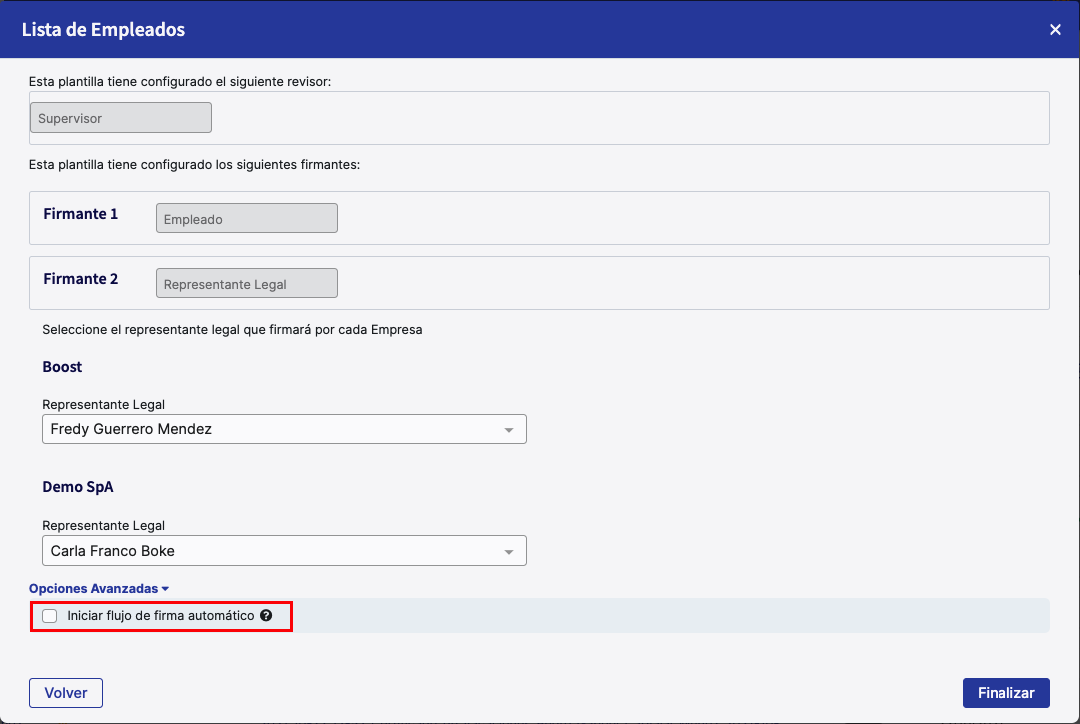
- Generate document:From "Administrativo," go to the "Documentos y Firma" module, choose "Documentos." There, click on the "Generate Documents" button. A pop-up window will open where you can select the document template and then choose the employees for whom the document will be generated. If the selected employees have different frequencies, you must select a default period for each type of pay frequency, in order to define the date variables associated with that period. The signature workflow will be based on what is set in the template. If you have selected a legal representative or more in the template, define who will be the representatives signing the document and, once you are ready, click on "Finish."
Note:By checking the "I want the documents to be generated as visible" checkbox, the advanced option to start the signature workflow is enabled, automatically notifying the signers as their turn comes up. It should be noted that the document will be visible to the signer when it is their turn to sign; if the template does not have a signature order configured, all signers will be notified simultaneously.
- Upload document:When using the "Documentos (modificador)" importer, select the documents you want to import, whose name must be specificto be able to identify each employee. The name must include a unique identification for each employee, such as Rut, ID, DNI, RFC, among others.
There are two formats for indicating the file name:
- Ifthere is only one profile per employee: The file name must be the employee's identification without dots or hyphens, for example: 111111111.pdf.
-
If there are multiple profiles enabled: The file name must contain the employee's identification, followed by "-F " and then the profile code. Assuming the employee has a profile code "F1," then the document/folder name would be:
- 111111111-FF1.pdf
- CONTRATO111111111-FF1.pdf
On the other hand, set the destination for the document to be uploaded. Currently, there are three options:
- Keep Structure:The structure of selected files and folders is maintained.
- Root Folder:All folders and files are uploaded to the employee's main folder.
- Specific Folder:You can select the folder to which the documents will be uploaded, where a box will be displayed for you to enter the name of the destination folder.
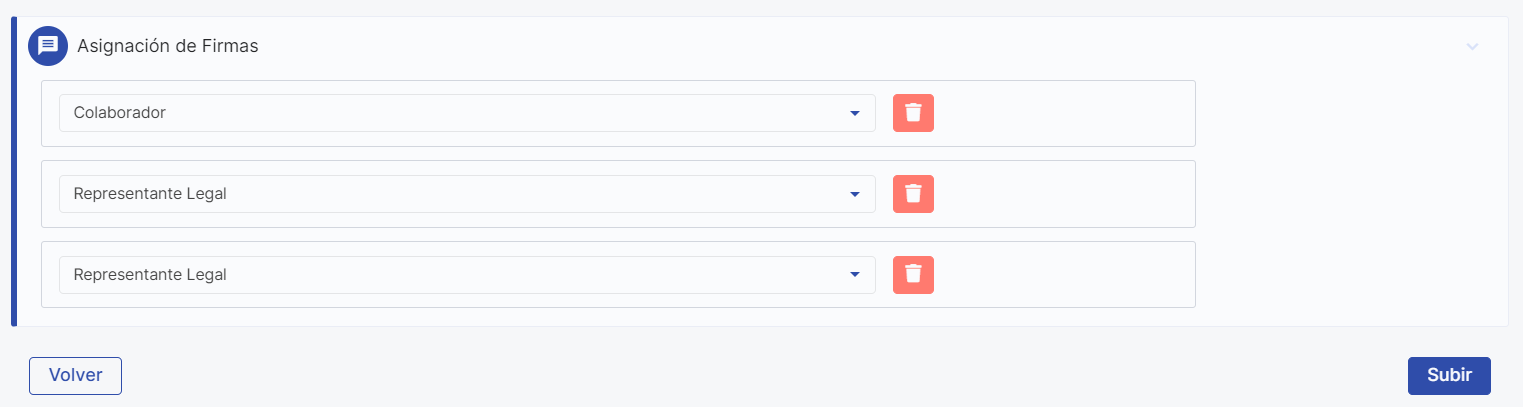
Once you have selected the files or folders to upload, in the "Signature Assignment" section you must select your signer configuration. Finally, if you choose a signer of "Type" Legal Representative, you must select those representatives for each company as appropriate. Finally, click "Upload" and/or "Finish" to complete the upload.
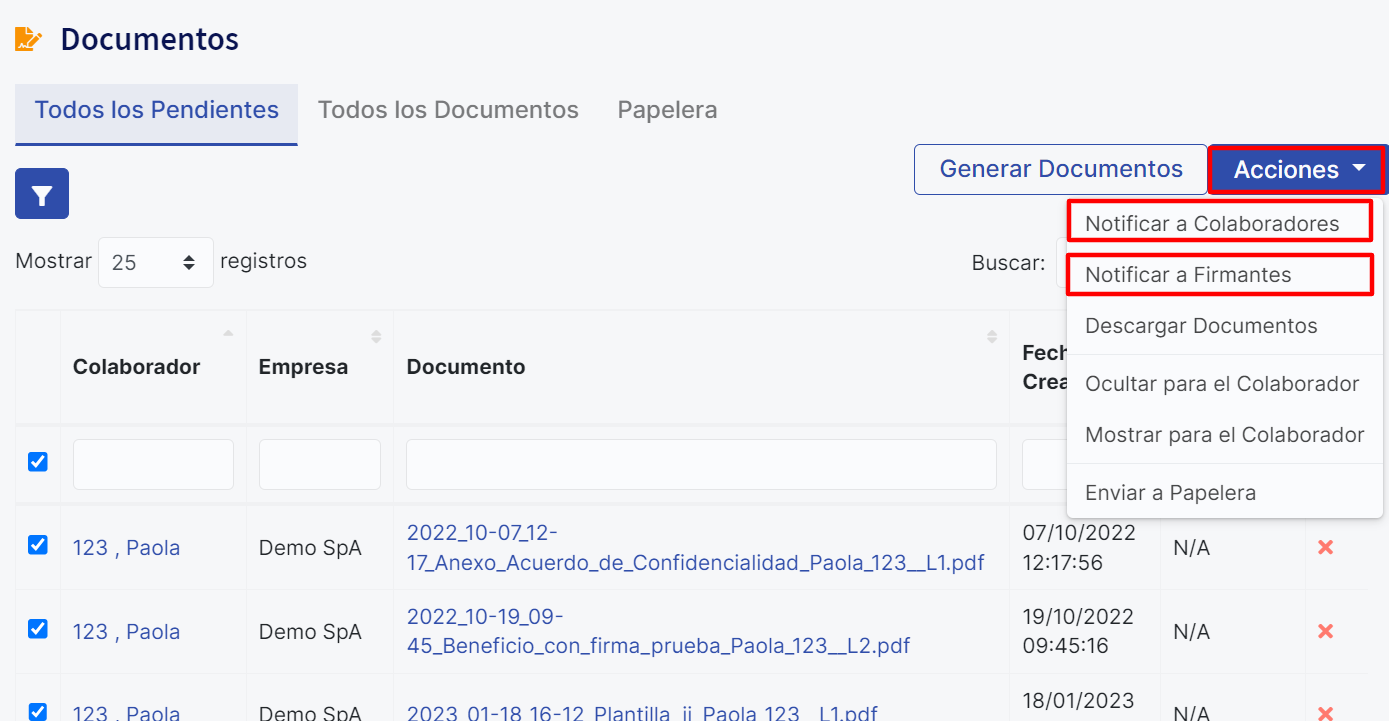
Once you have generated or uploaded the documentyou can make it visible and notify it in bulk. To do this, go to "Administrativo" in the "Documentos y Firma" module by selecting "Documentos." In that view, select the documents to make visible and notify. Then, in the "Actions" button, you can select "Show for Employee" and select the signers to notify from the "Notify Employees" or "Notify Signers" (company) buttons, respectively.
In this way, we will have correctly entered documents into the platform.
General Considerations:
You can configure and manage your signers from the API; below we show you how:
- Manage signers from theAPI:In the POST /employees/{id}/docs of the Document Endpoint, you must select whether the document requires the employee's signature, the Legal Representative's signature, or another user's signature. To add a signer other than the Legal Representative, you must enter the person's ID in the “signatures” parameter in array format. In this same parameter, you could add the ID of a legal representative and thus not check the “signable_by_legal_agent” parameter. Keep in mind that if you assign any signer within the “signatures” parameter, the configuration of the “signable_by_legal_agent” and “signable_by_second_legal_agent” parameters will be deleted.
Required Modules:
- Base:People management.
- Modules:Digital Signature and Document Management.
Necessary or Associated General Settings:
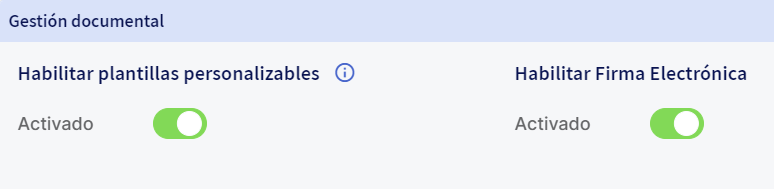
By contracting the "Digital Signature and Document Management" module, you will have access to edit and customize templates and use your electronic signature. Make sure the following settings are enabled in your platform to start defining your signature workflow: "Enable customizable templates" and "Enable Electronic Signature."
Keywords:Signers, signature, electronic signature, workflow, notify, document, template, supervisor, legal representative, employee, upload, import, generate.
Remember, if you need help you can contact us through our support channels.
Chat | Phone | Email.
We are happy to help you!

